Back: to | HoTT/Aventuria page | my Wargaming Page | my Main Page |
The history of Aventuria has seen many battles, some of them on quite
unusual terrain or in strange circumstances. Here are some of the more
important or unusual encounters as scenarios for HoTT battles.
Battles at the Troll's Gates:
Ogres' Battle 3rd Demons' Battle |
Bear's Crag |
The
Trolls' Gates
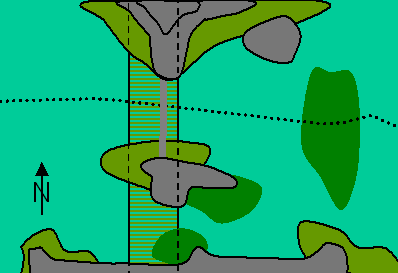
This narrow valley is a strategic choke point on the route between the central Empire and its Western Regions. As such it has been fortified by a solid wall for centuries. Within living memory, it has seen two epic battles. The valley is fairly wide. The wall, at the narrowest
point of the valley is 4000 paces wide(1).The wall
is solid enough to mount artillery. Artillery mounted on the wall can be
turned, but it cannot be moved away during the game
|
![]() |
(1) Feel free to rescale the battlefield to suit your game. For those who want to do it to scale: 1 HoTT pace = 0,75 Aventurian paces, measurements are given in Aventurian paces. |
The Ogres' Battle (in the year 1003 BF)
The Evil Mage Galotta bespells the Ogres to ravage the western provinces and march against The Empire. They were stopped in the Ogres' Battle at the Troll's Gates. |
|
The Empire | Use the The Empire
as described on the army list page. The Griffon and Dragon did not participate
in the battle.
As supports, use Magicians,
Military Orders,
Bornland Dragoons and a
Gjalsk war-chariot.
The Empire forces deploy defending the wall and the adjacent heights. They deploy first and maybe placed up to the dashed line 200 p to the East of the wall. The empire has an army camp stronghold at the Western edge of the board. |
The Ogres | Use the Ogres as described on the army list page. The Ogres deploy second along the Eastern side of the board and move first. |
The
3rd Demons' Battle
The invasion of the Evil Archmage Borbarad was stopped at the Trolls Gates in an epic battle that ended with Borbarad's eviction from the world of Aventuria. To do it justice, it really should be played as a big battle, with two or better three times the normal number of army points. |
|||||||||||||
The Empire | At least 1/3rd of the force should come from the The
Empire list as described on the army list page. Up to 1/3rd should
be Heroes, Magicians, Clerics and Military
Orders.
The rest consists of allies:
Yes, Dwarves, Elves and Orks; Thorwal and Al'Anfa all fighting together!
Orks fought for both sides in the battle.
|
||||||||||||
Borbarad's forces | The evil arch-mage Borbarad
himself participated in the battle. So the army should have an extra-powerful
Magician General.
It should be composed of up to 2/3rds (in Army Points) of 'natural' followers of Borbarad, mainly humans from The Empire or Maraskan, but also Orks, Goblins and Lizardmen. For the rest, use any number of Magicians, Demons and Undead. The Borbarad forces deploy defending the wall and the adjacent heights. They deploy first and maybe placed up to the dashed line 500 p to the West of the wall. Any Lurkers may be placed in the obstacle-covered area as well as in any other bad going. Borbarad has a stronghold at the Eastern edge of the board - a large heptagram for conjuring ceremonies. A modelling tip: The wall has been gruesomely decorated and magically altered. It has sprouted blades, tentacles and black vines. So go wild ! |
The Fight for Bjaldorn | |
Bjaldorn is a small city in the northern Bornland, with an important temple of the snow god Firun outside its gates. Baron Uriel von Notmark, in league with Borbarad forces attempted to take the city and destroy the temple. The city and temple proved immune to direct assault and Uriel hit upon a ruse. He disguised part of his force as a troop of horsemen under Bjaldorn's ally Thesia von Ilmenstein coming to relieve Bjaldorn and stage-managed an ambush on them. The defenders sallied out in support of their supposed allies. In the ensuing battle, the defenders were routed and Bjaldorn taken, but divine intervention saved the temple. |
![]() |
The southern part of the battlefield is forested, with a narrow gap with a road. The frozen river Letta curves through the northern half. Treat as good going..The fortified city of Bjaldorn (use fortification rules such as suggested on the main army list page) stands on a rocky outcrop (bad going). The temple is surrounded by a ring of trees - treat as a wood. | |
The battle could be played with two Bornland armies of your choice, but here are the scenario army lists as per the battle's description in the novel Steppenwind: |
Bjaldorn's defenders | ||||
Deploy north of the river, within 200 p of Bjaldorn or the temple. | ||||
Unit | HoTT type | points | numbers | Comments |
Baron and his bodyguard | Spear General | @ 2 AP | 1 | |
Baron's Knights | Knights | @ 2 AP | 1 | |
Baron's archers | Shooters | @ 2 AP | 1 | |
Firun Priests | Clerics or Shooters | @ 3/2 AP | 1 | Firun is also the god of the hunt. In the novel, his priests are more effective shooting than praying |
Military Orders | Knights | @ 2 AP | 1 | |
Bjaldorn city levy | Spears | @ 2 AP | 1 | |
Bjaldorn Landwehr | Hordes | @ 1 AP | 1-2 | To be replaced in Bjaldorn, not at the table edge. |
Nivesian allies | Rangers | @ 2 AP | 1 | |
Waldschrat Treemen | Behemoths | @ 4 AP | 2 | Deploy in the forest like lurkers. Afterwards, play as normal behemoths. |
Firun | God | @ 4 AP | 1 | Can only be deployed next to the stronghold, and only if the stronghold is being attacked |
Total AP | 24+6+4 | 6 extra points for the Ilmenstein force, 4 extra for Firun |
Figures: Firun and his priests look like American Colonial-era Backwoodsmen or Trappers, in leather dress with Raccoon caps. Armed with bow and arrows instead of a Kentucky rifle. |
The Attackers: Uriel von Notmark's force | ||||
Deploy anywhere, but not within 400 p of Bjaldorn or the temple. | ||||
|
|
|
|
|
Uriel von Notmark and his staff | Knight General | @ 2 AP | 1 | |
Mengbillar | Magician | @ 4 AP | 1 | |
Girte von Strachnitz's mercenaries | Blades | @ 2 AP | 1 | |
Baron's Knights | Knights | @ 2 AP | 1 | |
Mercenary horsemen | Riders | @ 2 AP | 1 | |
Mercenary spears | Spears | @ 2 AP | 1 | |
Gjalsk mercenaries | Warband | @ 2 AP | 1 | |
Goblin Archers | Shooters | @ 2 AP | 1 | |
Goblin Skirmishers | Rangers | @ 2 AP | 1 | |
Harpyes | Flyers | @ 2 AP | 1 | |
Total AP | 24+6 | 6 extra points for the Ilmenstein force |
The fake relief: Thesia von Ilmenstein's force | ||||
The ruse described above
will not work on the wargames table. Instead, it should not be clear whether
the force supports Notmark or Bjaldorn.
At the start of the game, the force arrives on the southern road . It is controlled by the defending Bjaldorn player - this represents the stage-managed moves. At the moment the first element of either side is to be eliminated in a combat involving this force, throw a die: on a 1-3 they are a real relief force and support the defenders. The element that lost the combat is removed on a 4-6 it was all a stage managed fight. The 'lost' element is not removed. The 'Ilmenstein' force becomes part of the Notmark force. For victory points purposes, the Ilmenstein force counts as part of both forces. They count as lost for the player who lost the control dice throw from that moment on. Think of this as dashed hopes for the defender. For the attackers, the baron had a 'cunning plan' that failed when a real relief force arrived. |
||||
Thesia von Ilmenstein | Knight General | @ 2 AP | 1 | |
Thesia's Dragoons | Knights |
|
|
The fight for Bear's Crag | |
Bear's Crag is the narrowest part of the Sichelstieg path, the only link between the Duchy of Weiden and those parts of Tobria, not overrun by Borbarad forces. The narrow pass is frequently harrassed by raiders from the Black Lands. A force.of Weiden knights and their allies attempt to clear the area |
![]() |
Bear's.Crag is a narrow pass between two steep mountain. A rockslide has nearly blocked the pass. The rocky area is marked as the shaded area and counts as bad going, as do the grey areas at both sides. | |
You could use any Empire and Borbarad army, or use these list as described in the Aventurische Bote 90: |
Attacker | ||||
Deploy on the left edge of the game board | ||||
|
|
|
|
|
Pagol von Löwenhaupt |
|
|
|
|
Amazon Kyra |
|
|
|
|
Rondrasil Löwenbrand, Master of the Rondra army |
|
|
|
|
Nobles |
|
|
|
|
Weiden Esquires |
|
|
|
|
Military Orders, on Foot |
|
|
|
|
Military Orders, mounted |
|
|
|
|
Dwarves |
|
|
|
|
Dwarven Catapult |
|
|
|
. |
|
|
The Defenders : Lessankan, the Dragon and the Goblins | ||||
Deploy the goblins anywhere in the difficult terrain | ||||
|
|
|
|
|
Lessankan, golden dragon |
or Dragon |
|
|
It is not clear who should be regarded as commander of the defenders, a Goblin chieftain or Lessankan. |
Goblin-Chieftain |
|
|
|
|
Pearly Dragon |
|
|
|
|
Goblin archers |
|
|
|
|
Goblin skirmishers |
|
|
|
or Warband |
|
|